Do you want to add a popup form to your site?
Popups help you draw the attention of the user at the right time to get them to take action such as sign up for a newsletter or complete their purchase.
The best way to add popups to your site is by using a WordPress popup plugin. This makes it easy to create a custom popup that appears at the right time and place to get users to engage with it.
In this step by step tutorial, we’ll show you how to create a popup form on your WordPress website in under 10 minutes.
How to Create a WordPress Popup Form
For this tutorial, we’ll use a powerful tool called OptinMonster.
OptinMonster is hands down the #1 WordPress popup builder in the world. It’s got everything you need to create and customize stunning popups for your site.
You can choose from 50+ premade templates or you can start from scratch. The popup builder is easy to use making it a great choice for beginners. It’s based on a drag and drop interface, so you can visually build your popup by dragging and dropping elements where you want them to appear.
You get complete control over every aspect of your popup including colors, images, videos, background, and more.
What stands out about OptinMonster is its powerful targeting rules. This lets you display your popup when a user is:
- Viewing a specific page
- About to exit your website
- Inactive for a while
- Located in a specific geographical area
- Coming from a specific referral source
- Scrolling to a certain point on your page
- Coming from a specific referral source
- Has added items to the cart and not checked out
- A new user or repeat user
- Using a particular device like a laptop or phone
Like this, there are so many rules you can use to show your popup at the right time and place when the user is more likely to respond. This greatly improves user experience which is a boost for SEO as well.
To get started, the first thing you’ll want to do is sign up for an OptinMonster account. Then make sure you’re signed into your OptinMonster account in a separate tab.
OptinMonster comes with a free connector plugin for WordPress. You can install this on your site from the WordPress.org repository.
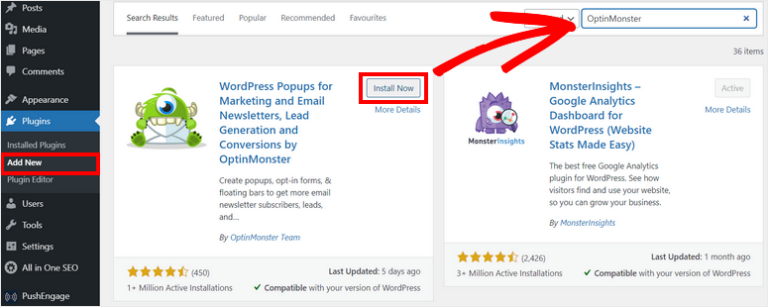
Once activated, you can connect to your existing account. OptinMonster will auto-detect your sign in on the other tab and connect your site.
Now you’re ready to create your first WordPress popup.
Step 1: Create a Popup Campaign
From your WordPress dashboard, navigate to OptinMonster » Popup. This will open up the library of templates.
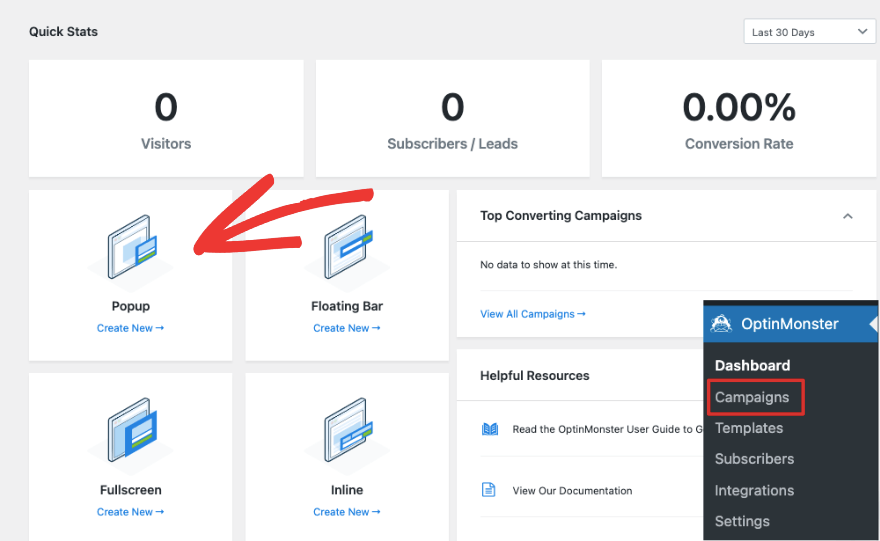
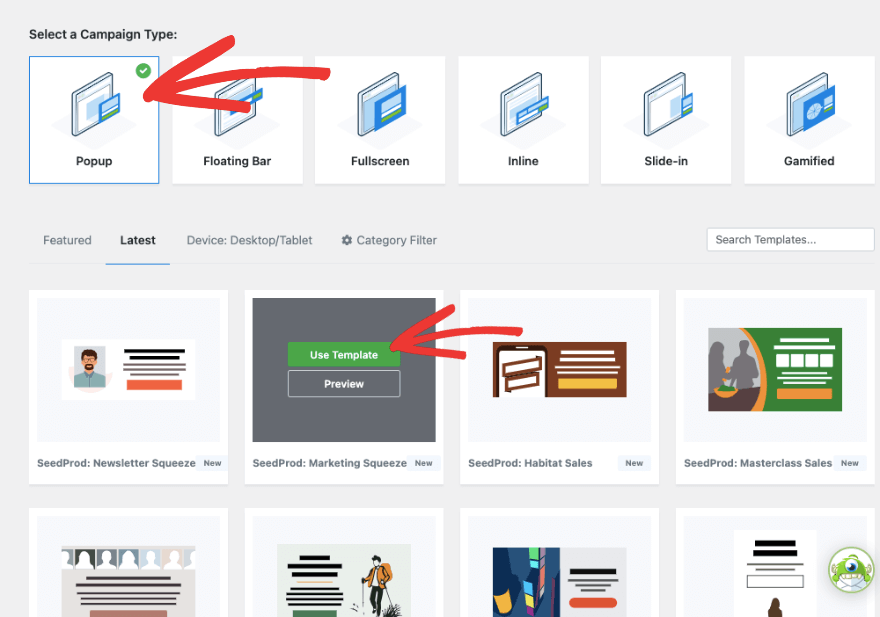
On this page, first select Popup and choose your template. You can browse through the options here and when you’ve found the right one, click on the Use Template button that appears as you hover your mouse over it.
Then you’ll see a popup window appear where you can add a name for your campaign.
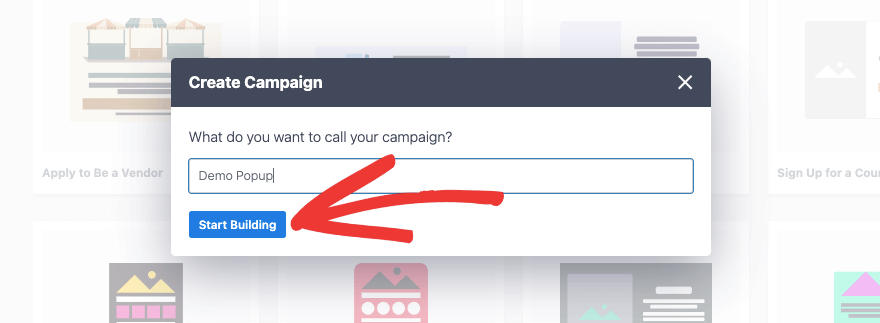
This is for internal use so that you can keep all your OptinMonster campaigns organized.
Step 2: Customize the popup
Now you’ll see the OptinMonster campaign builder with a preview of the template you selected on the right. There’s a taskbar on the left with options to add new blocks and make edits.
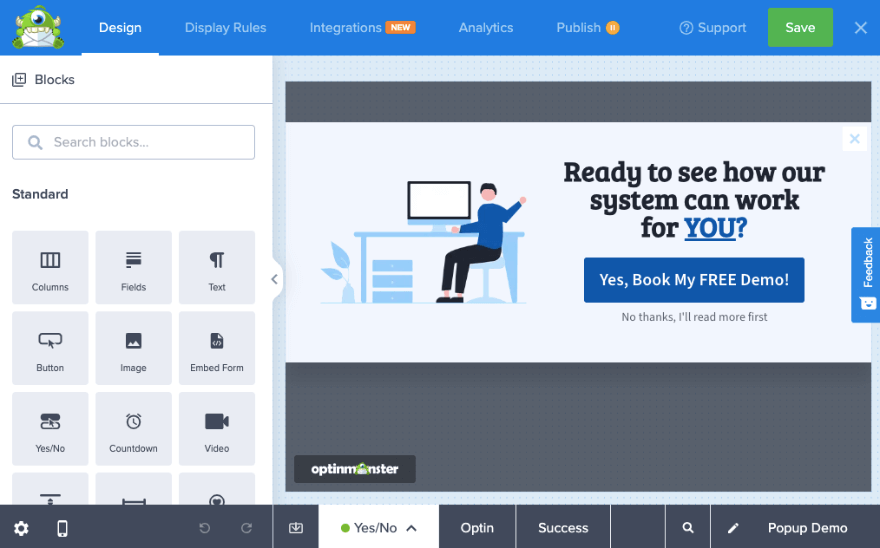
This is a Yes/No campaign template. That means the user will have the option to click on a ‘yes’ button that lets them redeem the offer on the next page by entering their email ID. Or they can refuse the offer by clicking on a ‘no’ button and the campaign will close immediately.
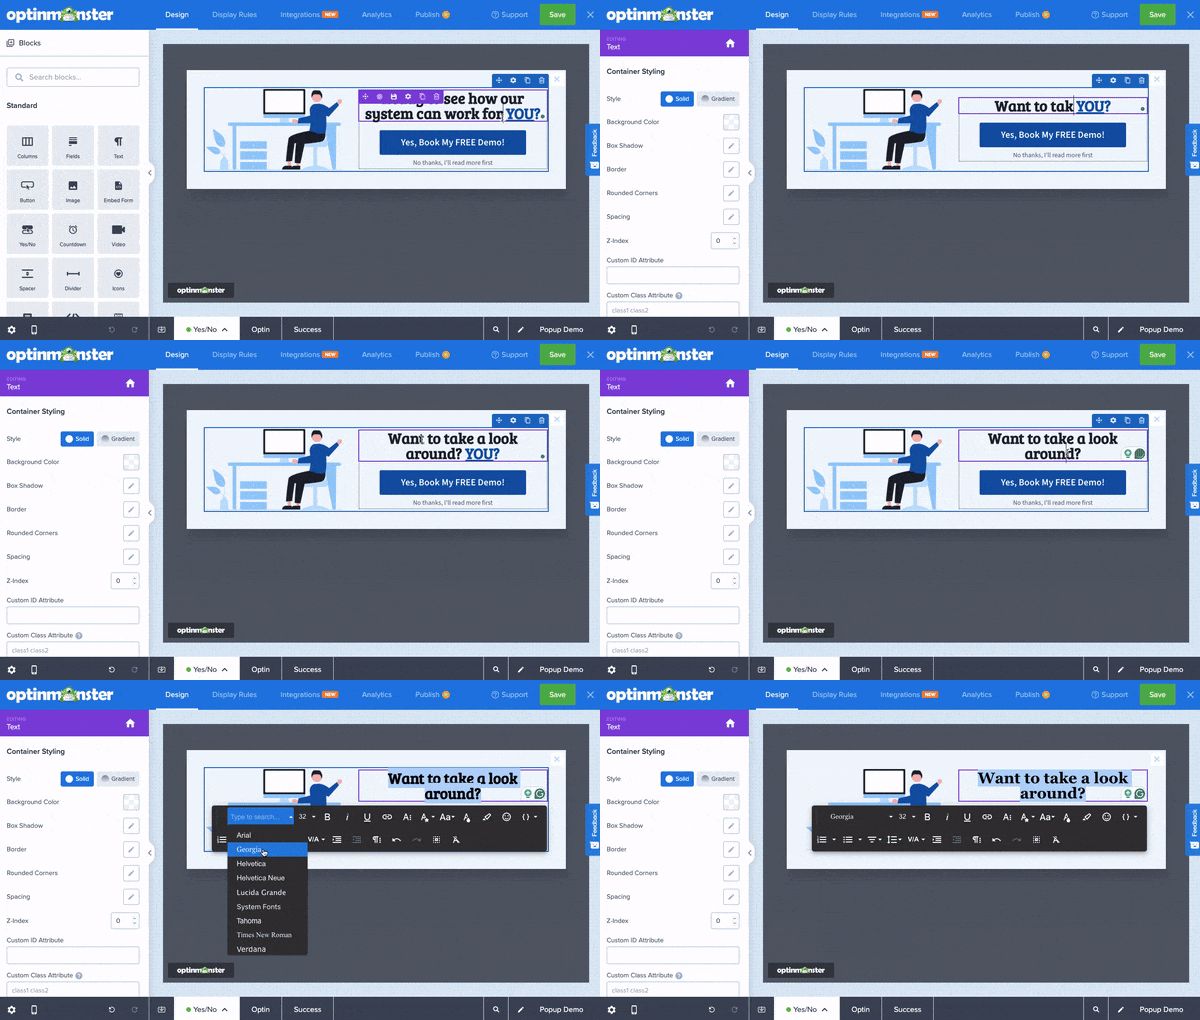
You can edit the content inside the popup box by simply clicking on it. Then select the text, delete it and enter your own. You’ll also see an editorial toolbar appear that lets you change the font, formatting, size, and more.
Next, let’s change the image in the campaign. Select it and you’ll see an option to replace the image on the left.
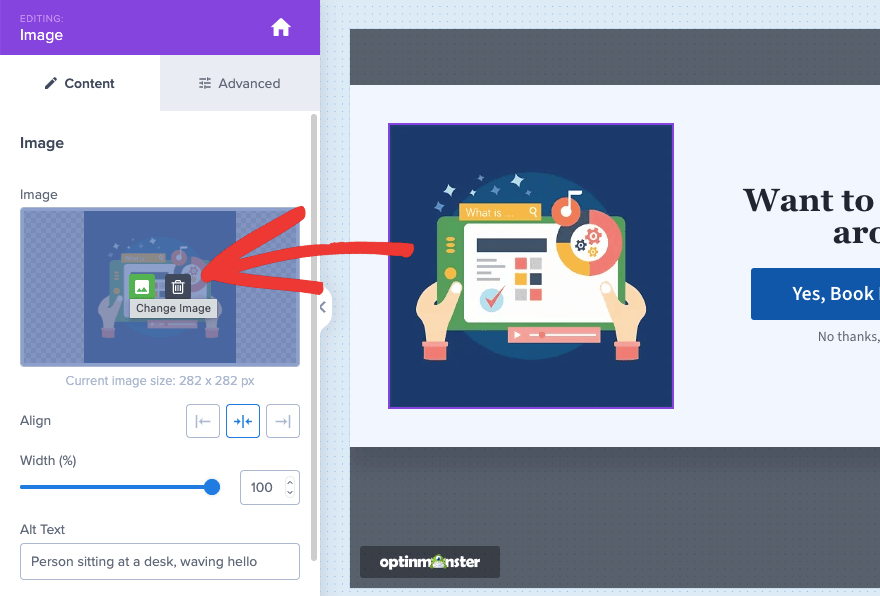
You can upload an image from your local computer or choose one from the Unsplash stock library. In this menu, you’ll also see options to align the image, change its width, add an alt text, and more.
If you’d like to change the call to action (CTA) button, you can click on it, and on the left, you’ll see options to enter your own button text. Below that, you can determine what happens when a user clicks on the button.
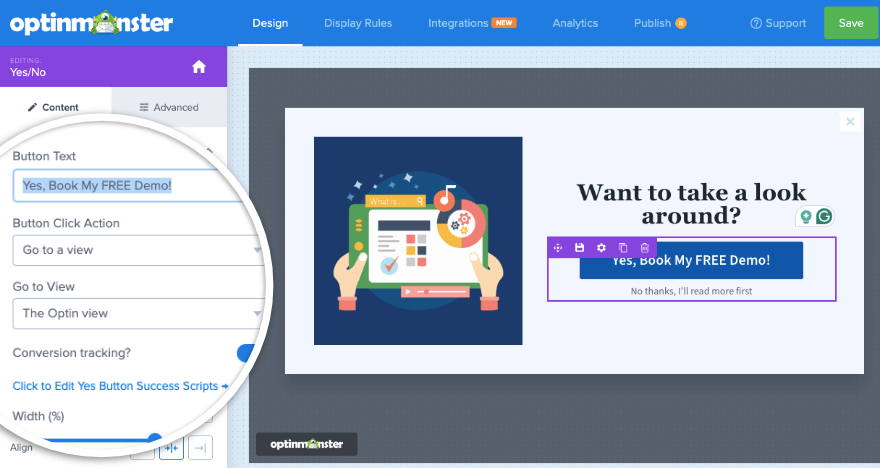
You can also track conversions from this button so that you know whether your campaign is bringing in results.
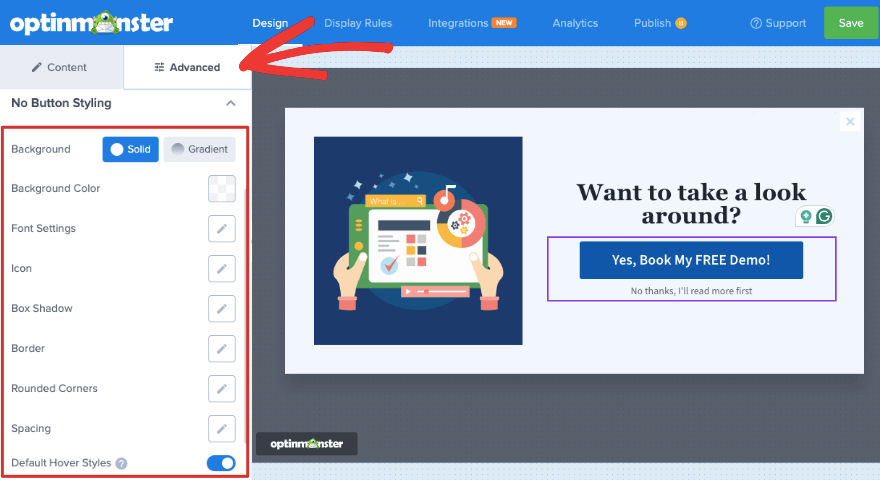
If you switch to the Advanced tab here, you’ll see options to change the button style, background, font, spacing, and more.
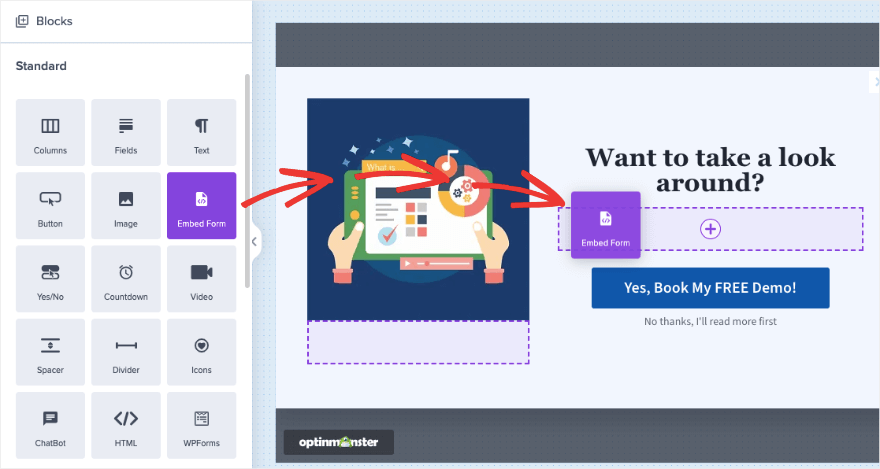
If you want to add a new block, simply drag and drop it into your preview. We’ll drop in the Embed Form block. This lets you add any form to the popup by entering the form’s shortcode here.
OptinMonster also works seamlessly with WPForms – the most powerful forms plugin for WordPress. You can add the WPForms block to your campaign and then choose your form from the dropdown menu or add the shortcode.
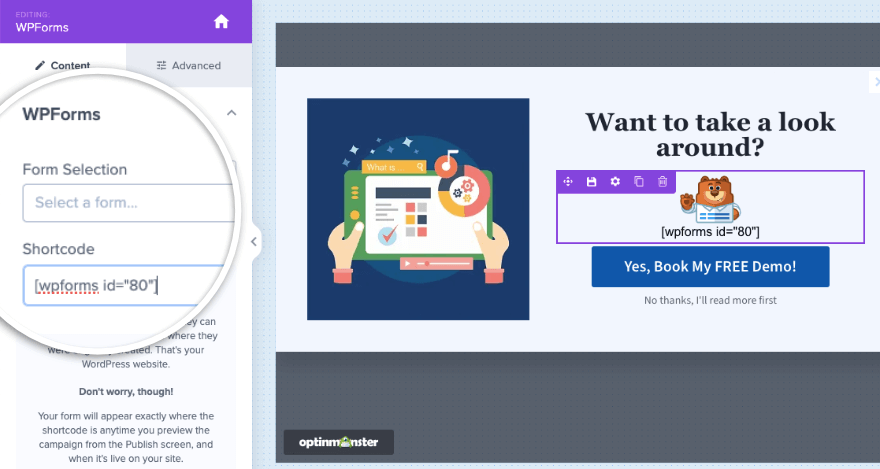
So for instance, you can embed a contact form here to collect your user’s name and email ID.
Want to learn how to build a form with WPForms? Follow our tutorial » How to Add a Contact Form in WordPress (5 Easy Steps).
In case you want to embed your form using HTML code, there’s a dedicated HTML block you can use for that.
Lastly, you’ll also want to switch to the Success tab at the bottom of the builder page. This is the message that will appear to users once they submit the popup form.
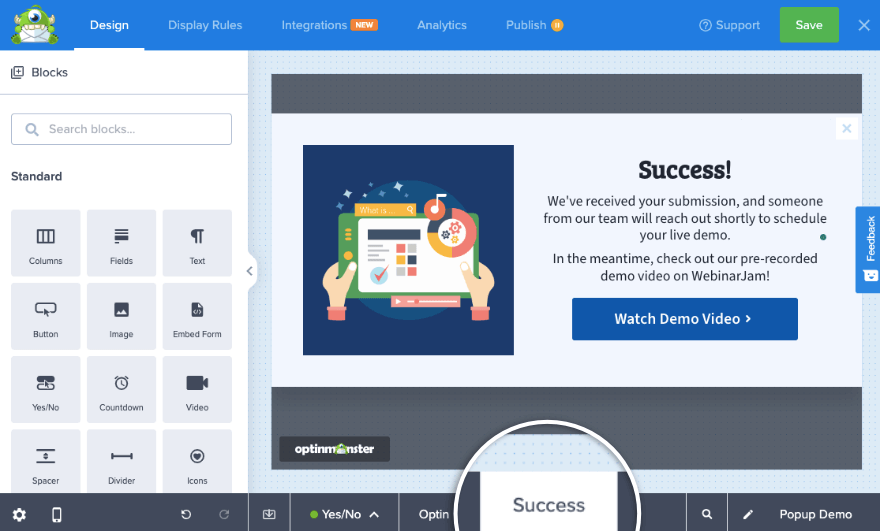
You can customize it to match your overall design.
When you’re happy with your campaign design, hit the Save button at the top of the builder. Then you can move on to the next step where we’ll show you how to add targeting rules.
Step 3: Add Targeting Rules to the Popup
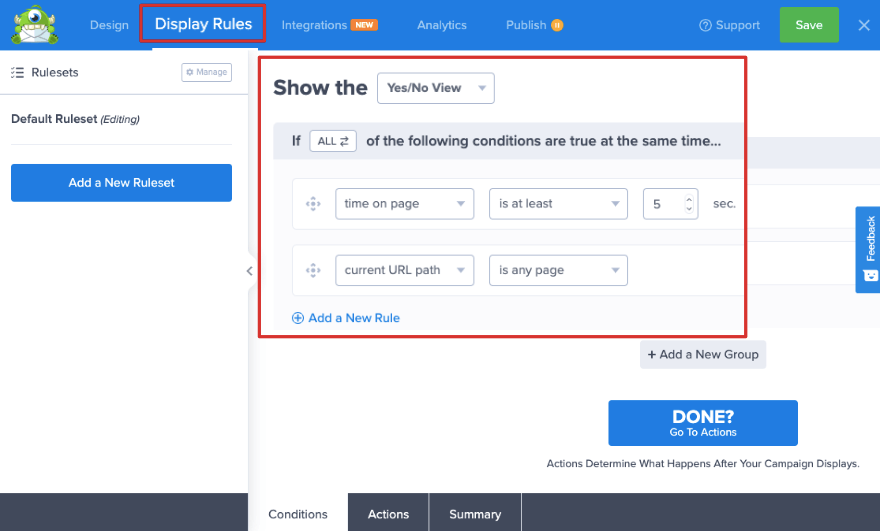
In the top menu bar, switch to the Display Rules tab. Here you’ll see that by default, OptinMonster will display this popup if a user spends at least 5 seconds on any page.
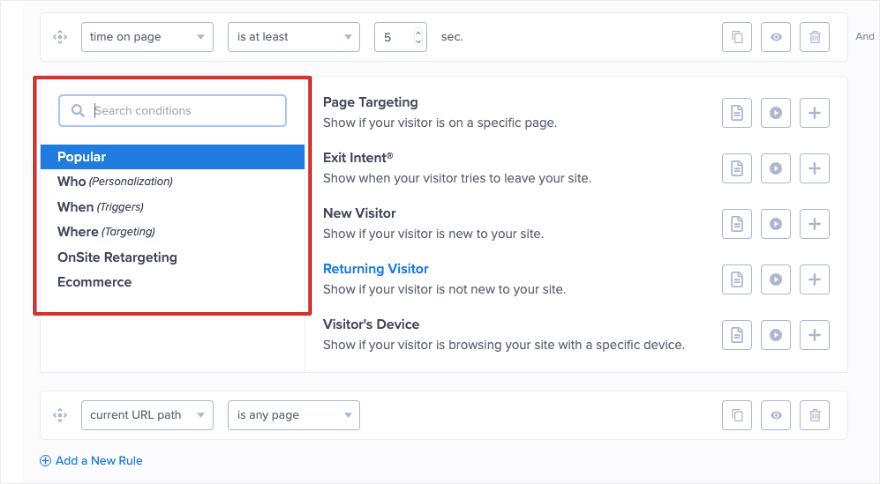
To change this click on ‘time on page’ and you’ll see the display rules library appear.
This library is full of powerful rules to target your audience precisely. The rules are neatly categorized by who, when, where, onsite retargeting, and eCommerce.
You can make the popup appear on click, immediately on page load, or with a time delay.
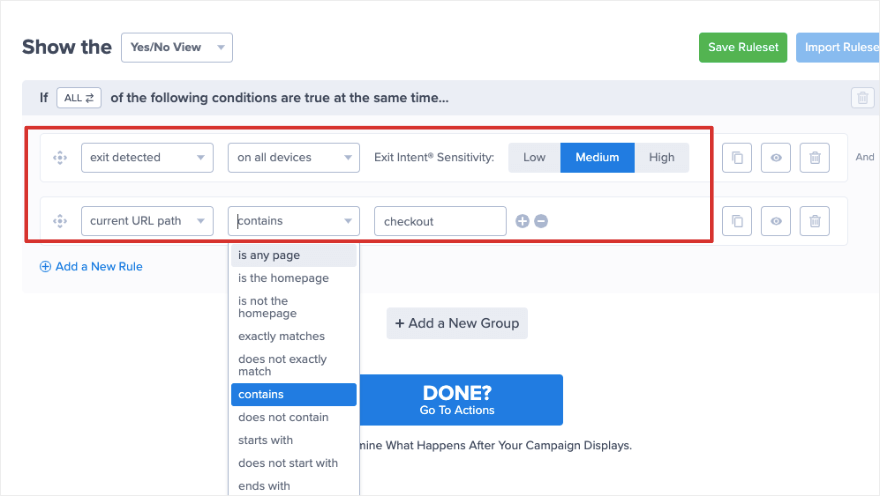
For this tutorial, we’ll choose the Exit Intent functionality. This will detect when the user is about to exit the site and will display the contact form popup to get them to stay.
Now you’ll see the ‘Exit Detected’ rule is added. You can choose to show on all devices or specific devices such as only laptop, and not mobile. You can also choose what level of sensitivity you want the detector to use. We recommended leaving it on ‘Medium’ here.
For the second rule, you can choose to target your audience on specific pages. We’ll choose to display this popup if the user is abandoning the site on the checkout page.
So we’ve set the rules here to the ‘Current URL path contains checkout’.
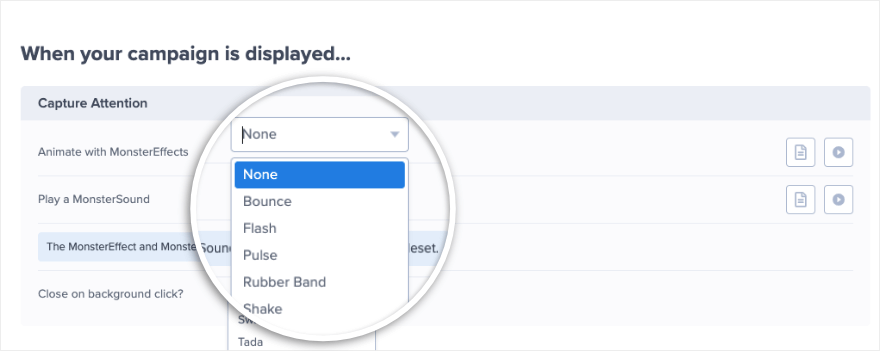
When you’re ready, click on ‘Done? Go to Actions’. On the next page, this popup maker plugin lets you choose to add animation and sound effects to your campaign.
This will really make your campaign pop!
Make sure to save your changes and head over to the next step.
Step 4: Integrate with Email & Analytics
If you’d like to send new leads straight to your email marketing or CRM account, OptinMonster makes that easy for you. Under the Integrations tab, you can quickly connect to your accounts on platforms like HubSpot, Constant Contact, Mailchimp, Zapier, and more.
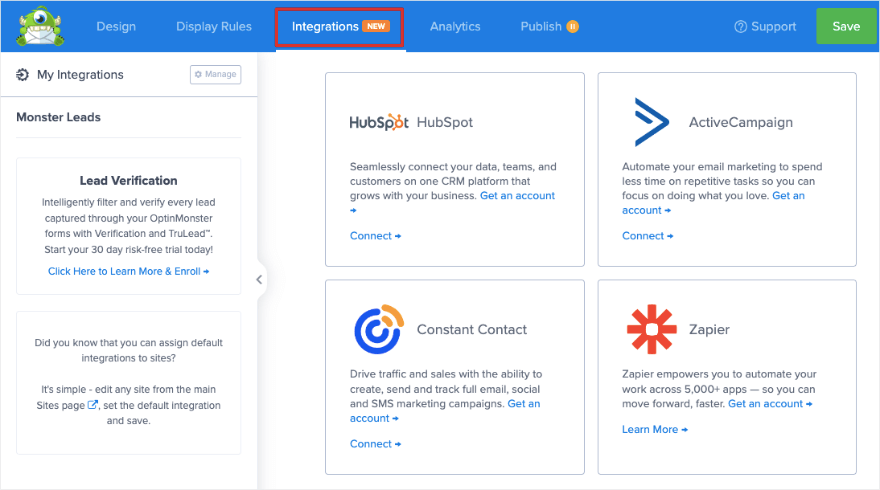
All you have to do is click on the service you want to connect and follow the onscreen instructions to complete the integration. There are no complicated steps involved.
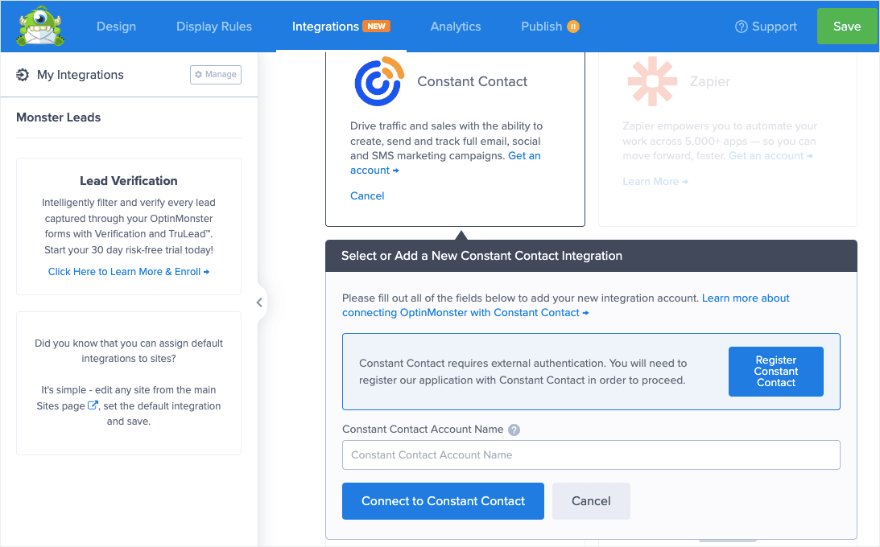
Once you connect your account, all new leads will automatically be tagged and added to your email list.
If you’re using WordPress to send emails, then make sure you set up an SMTP plugin on your site. This will ensure that all emails are delivered and received without any hiccups.
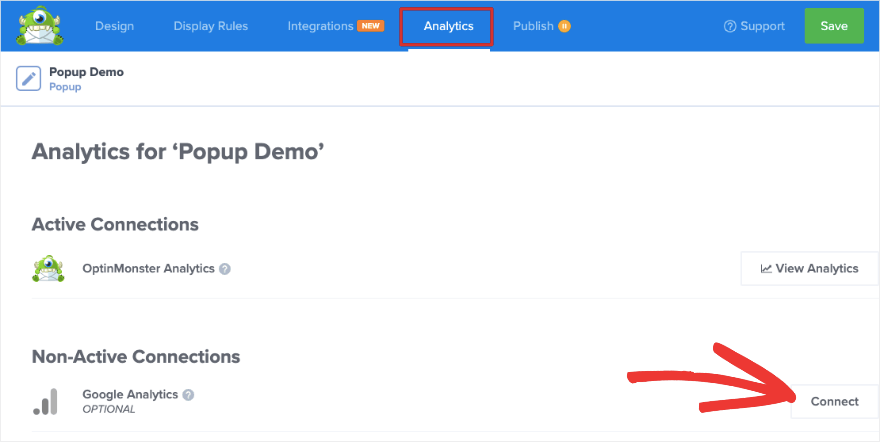
In the next tab ‘Analytics’, you’ll see that by default, OptinMonster comes with built-in analytics. This tracks campaign views, clicks, and revenue as well.
You can also connect your campaign to Google Analytics if you want to collect data there. You can gain valuable insights into WooCommerce data as well.
Now you’re ready to publish the campaign.
Step 5: Publish the Popup in WordPress
Open the ‘Publish’ tab in the OptinMonster campaign builder. You can connect your campaign to multiple sites here. OptinMonster also gives you an overview of your popup settings on the right sidebar.
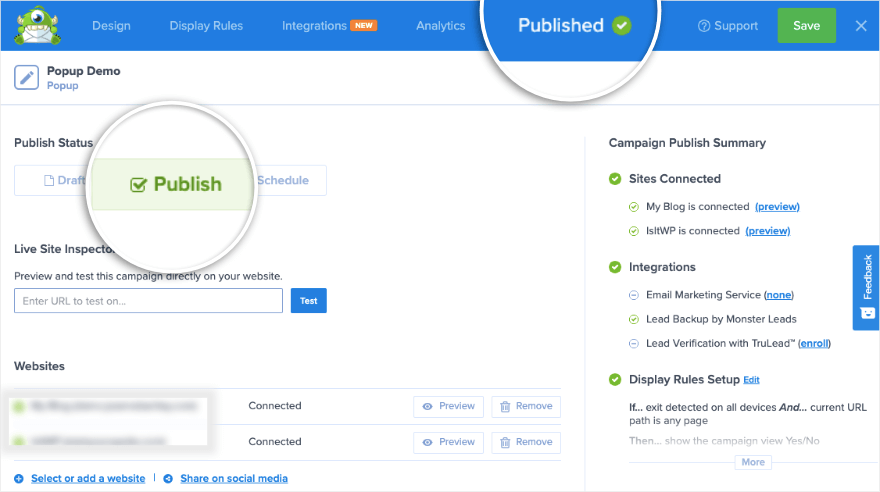
To publish the campaign, set the Status to ‘Publish’ and you’ll see the top menu change to ‘Published’ along with a green tick.
If you want to preview your new popup, there’s an option to do that here. This will take you to the OptinMonster Campaign Testing Tool. It will show you a live preview of what your popup will look like on your WordPress site or a specific web page.
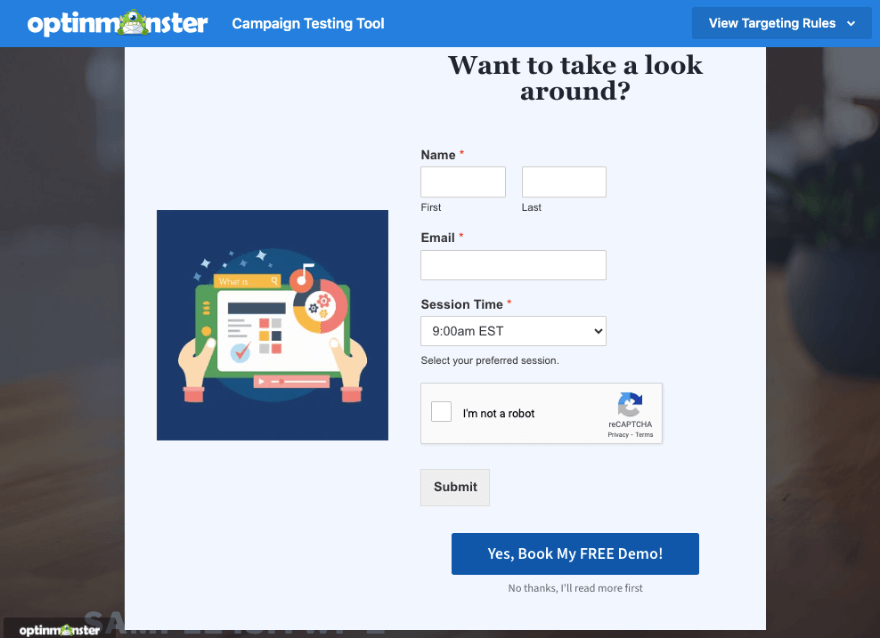
That’s it. Your campaign is live.
Since you’re using the WordPress connector plugin, you’ll want to head to your WordPress dashboard. Go to OptinMonster » Campaigns. Here, make sure you hit the Publish button so that the campaign status is set to Published.
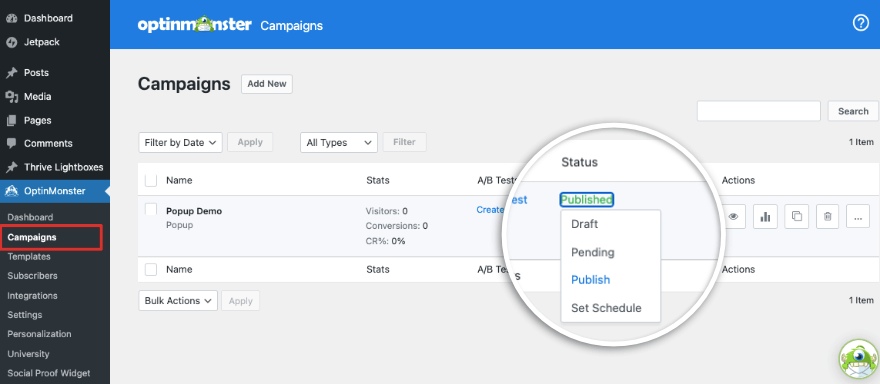
Once users start interacting with the popup, you’ll see stats appear on this page alongside the campaign. You can see website visitors, conversions, and conversion rates. There’s also an analytics icon under the Actions column. This will give you deeper insights into all your OptinMonster campaigns.
Finally, you can also set up A/B testing campaigns to find out what’s working better with your audience.
That’s all.
You’ve successfully created, customized, and published a popup on your site. Plus, you can continue to use OptinMonster to build all types of popups for your site.
Aside from popups, you may also want to create stunning sliders and image galleries on your site. This will make your site more appealing and keep users engaged for longer.
We hope you found this tutorial helpful.
If you’re interested in learning more about creating WordPress forms, check out our WPForms 101 Course that’s packed with video WordPress tutorials that are easy to follow.
Next, we recommend checking out our other guides:
- 7 Best Form Builder Plugins for WordPress (Compared)
- 19 Best WordPress Page Builders Reviewed (Expert Pick)
- 13 Best WordPress Lead Generation Plugins (Compared)
These guides reveal more of the best tools for building forms and pages on your site. The last post will help you get more leads on your site.


Leave a Reply