Interested in creating an autoblog in WordPress?
Autoblogs are websites that automatically pull content from other sources, such as RSS feeds, and publish it on your site. This can be a great way to automate content creation and keep your WordPress site fresh with minimal effort.
However, it’s essential to approach autoblogging ethically and legally, respecting copyright laws. If you want your efforts to have a long-term impact, you’ll want to make sure that the content adds value to your audience.
In this guide, we’ll show you how to create an auto blog the right way.
What You Need To Know About Autoblogging
An autoblog can save you time and effort by automatically publishing content relevant to your niche. It can also help keep your WordPress website updated with fresh content, which is essential for SEO and attracting visitors. However, it’s crucial to use autoblogging responsibly and ensure that the content you’re sharing adds value to your audience.
When it comes to autoblogging, we recommend the following:
- Regularly monitor your autoblog to ensure that the content being published is of high quality and relevance to your audience.
- Consider supplementing autoblog content with your own content created by you or your team to provide additional value to your audience.
- Be sure to comply with copyright laws and attribution requirements when using content from other sources on your autoblog.
- Search engines penalize websites with a lot of duplicate content. Ensure your autoblog curates or rewrites content to avoid penalties.
- Consider how you’ll generate income from your autoblog, such as ads or affiliate marketing.
- Autoblogs often deal with a lot of content. Choose from lightweight WordPress themes that load quickly.
Keep in mind, when creating a public auto blogging website, link to the original source for complete articles and proper attribution.
That said, let’s get started with this easy step-by-step guide on how to create an autoblog.
How to Create an Autoblog in WordPress
In the tutorial below, you’ll learn how to set up a legitimate automated blog using the WP RSS Aggregator plugin. It is the perfect plugin to quickly import RSS feeds, and aggregate and curate content from all over the web.
It’s quick and easy to set up on your site making it perfect for beginners. The free version of the plugin allows basic functionality. You can put your content on autopilot and manage your RSS feed sources with ease.
It includes customizable displays, video aggregator for YouTube videos, and auto-updates for content. The plugin also comes with a built-in attribution that automatically credits the author and original creator.
It’s easy to display the feed anywhere using the WP RSS Aggregator block or shortcode.
Once set up, you’ll have a constant flow of fresh content to keep your audience engaged.
For more plugin options, see 6 Best Autoblogging Plugins for WordPress to Speed Up Your Writing.
Step 1. Install and Activate the WP RSS Aggregator Plugin:
To install a plugin, log in to your WordPress dashboard, navigate to the Plugins section, and click on the Add New Plugin option. Then, search for “WP RSS Aggregator” in your WordPress plugin directory and activate it.
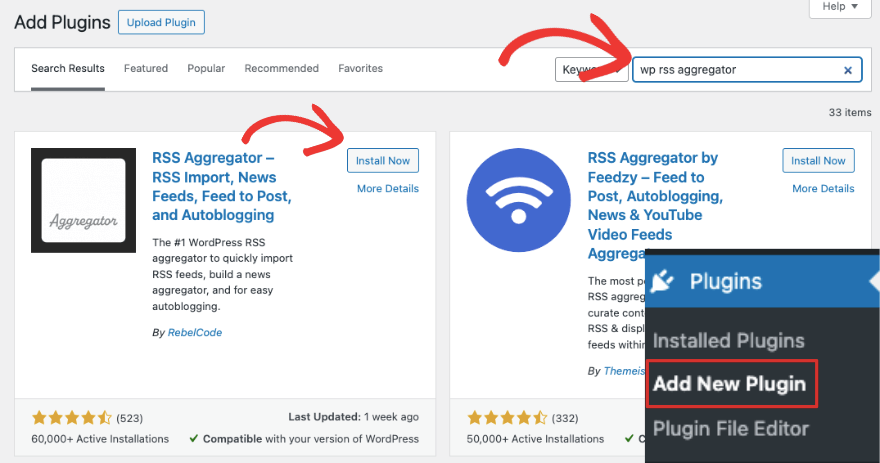
If you want premium features, sign up for a WP RSS Aggregator Pro plan.
This unlocks features like converting RSS feeds into WordPress pages, posts, or any custom post type. It also includes importing full content including media, featured images, content curation, automatic filtering, and AI integrations.
Step 2: Add a New Feed Source
Once you’ve installed the plugin on your site, navigate to RSS Aggregator » Feed Sources in your WordPress menu.

Click on the Add New button to get started. This will launch a new page in the default WordPress style so there’s no learning curve here.
Give your feed source a title. We’re adding ‘Demo RSS Blog’ just as an example. Below that, you can add the RSS feed URL of the website you want to import content from and then hit the ‘Validate Feed’ option.
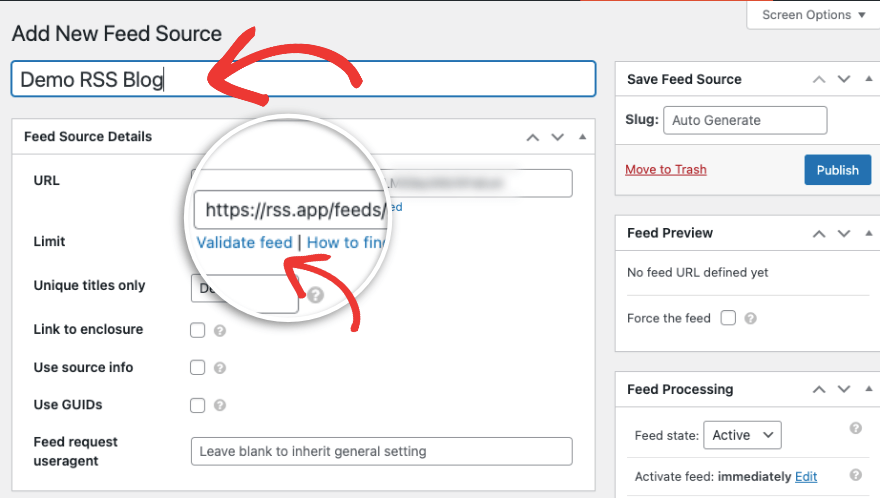
This is important as the plugin will check if it can fetch content from this URL. You’ll see a new page called W3C Feed Validation Service. Click on the ‘Check’ option here and you should see a message saying ‘Congratulations this is a valid RSS feed.’
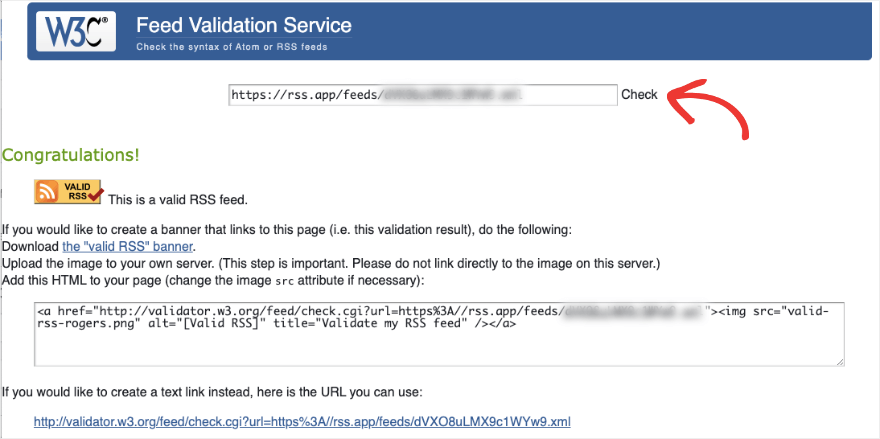
Now head back to your WordPress admin dashboard to edit the feed.
Step 3: Edit and Publish The RSS Feed
The user interface is self-explanatory and you’ll see tiny grey question marks. If you hover your mouse over them, it’ll give you an explanation of that setting.
So for instance, you can add a limit on how many items you want in your feed. You can also enable source information and use unique titles only.
In the right column, you can set the slug for your RSS feed.
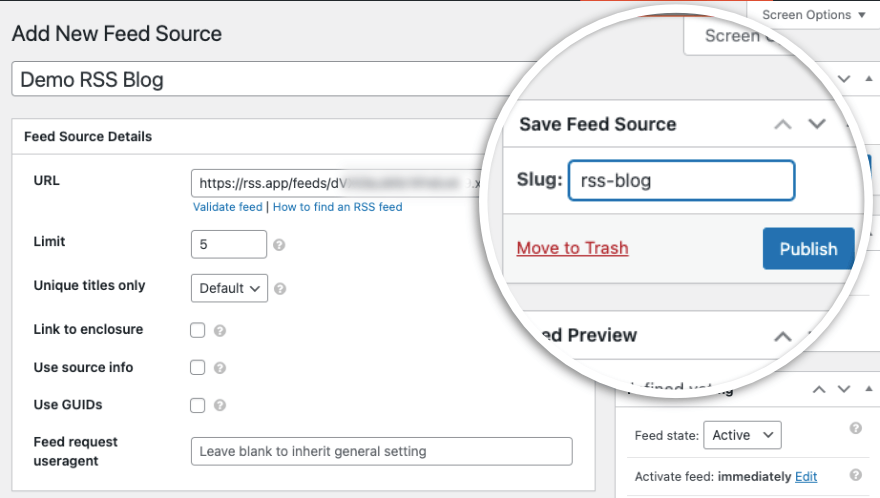
That’s it! When you’re ready, hit the Publish button and your RSS feed will go live.
You’ve successfully created an autoblog! Hurrah! Now lets explore key settings of this plugin to make sure you have the WordPress autoblog set up to your liking.
BONUS: Exploring RSS Feed Settings and Tools
Back on the Feed Sources page, you should see your new feed appear like so:
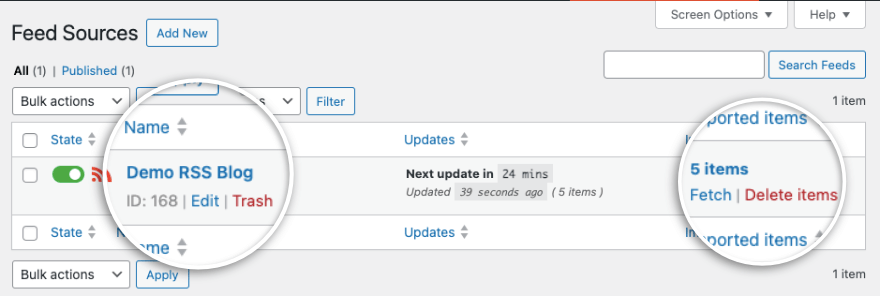
You can edit or trash the feed here. You’ll also see the number of items in this feed in the far right column. You can click on the fetch button to refresh the feed and fetch new content.
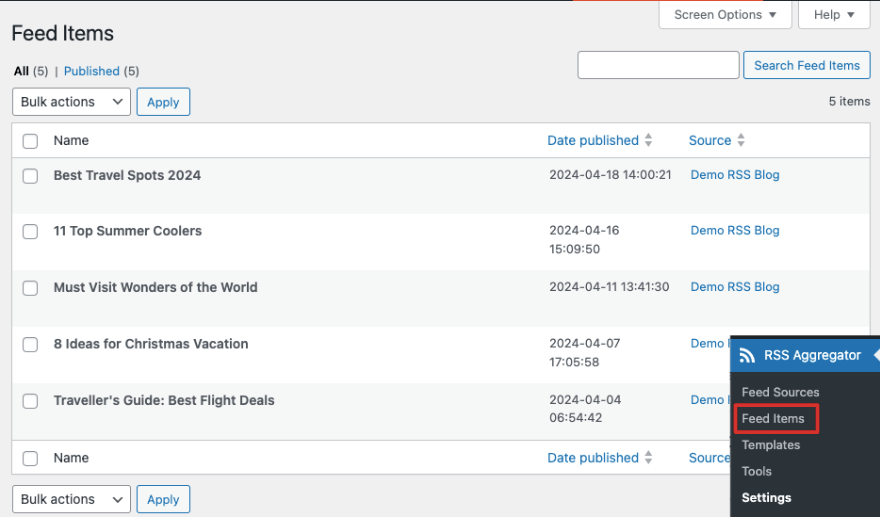
You can also access the Feed Items, under RSS Aggregator » Feed Items. Here you’ll see a list of new posts that are displayed under your RSS feed.
If you plan on setting up multiple RSS feeds on your site and would like to create a template of preferred options, this plugin lets you do that. It’s easy too!
Under the RSS Aggregator » Templates page, you can create a template. All you have to do is add a name and choose a template type.
Then there are plenty of customization options. You can choose your preferred options such as the number of items to show in a feed, the title length, how links open, and more.
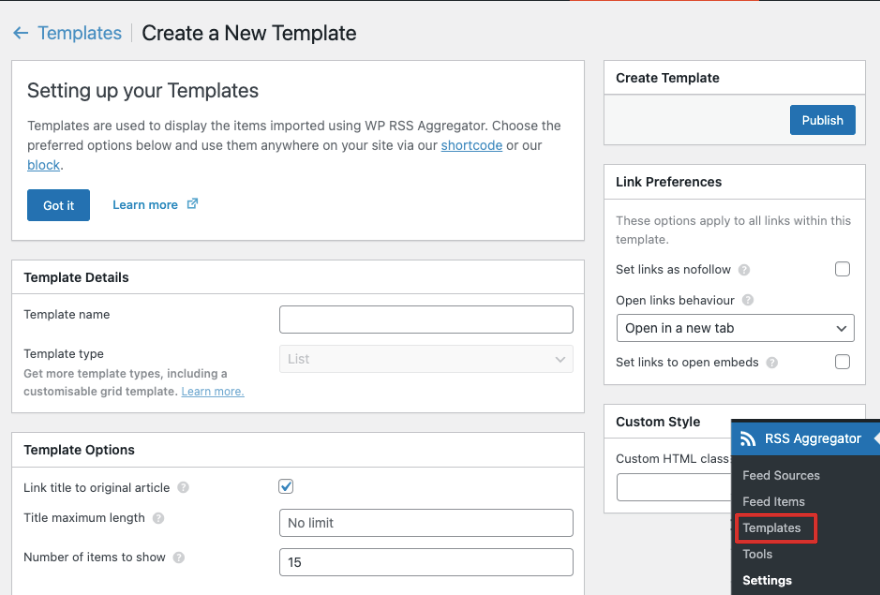
Make sure to hit the Publish button to create the template.
Now let’s check out some important settings of this plugin.
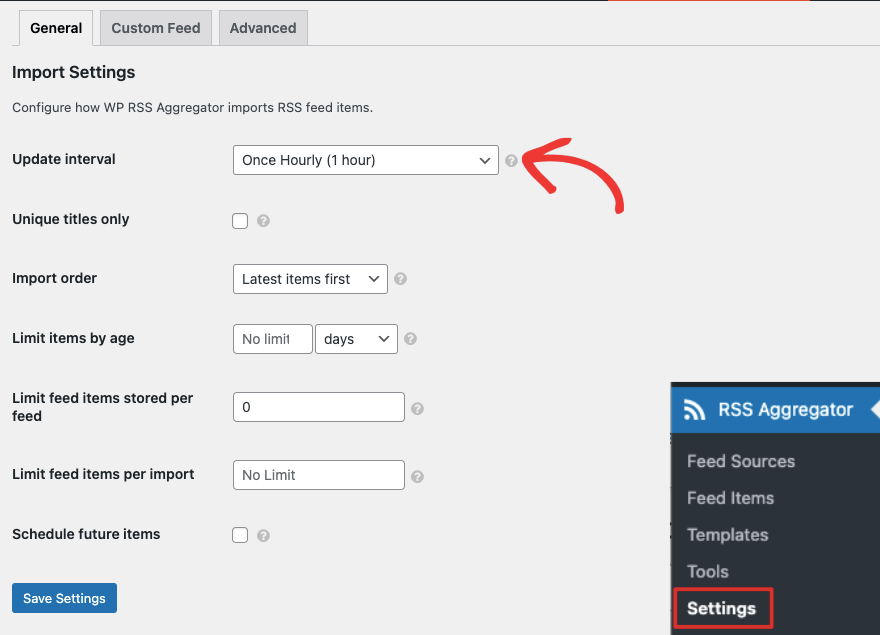
Head over to the RSS Aggregator » Settings in your WordPress menu. Under the General tab, you can choose how often the feed auto-updates. It’s set to hourly by default.
You can choose in what order the plugin should import content, and how many days old the content can be.
In the next tab Custom Feed, you can change the feed URL, title, and limit.
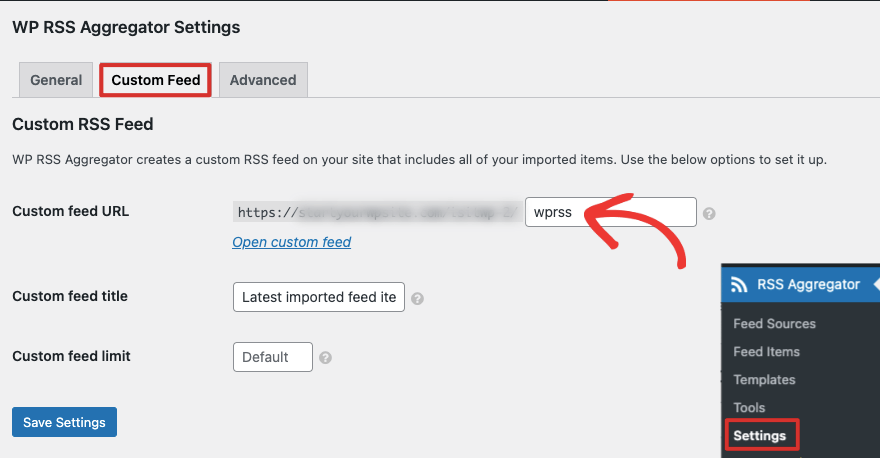
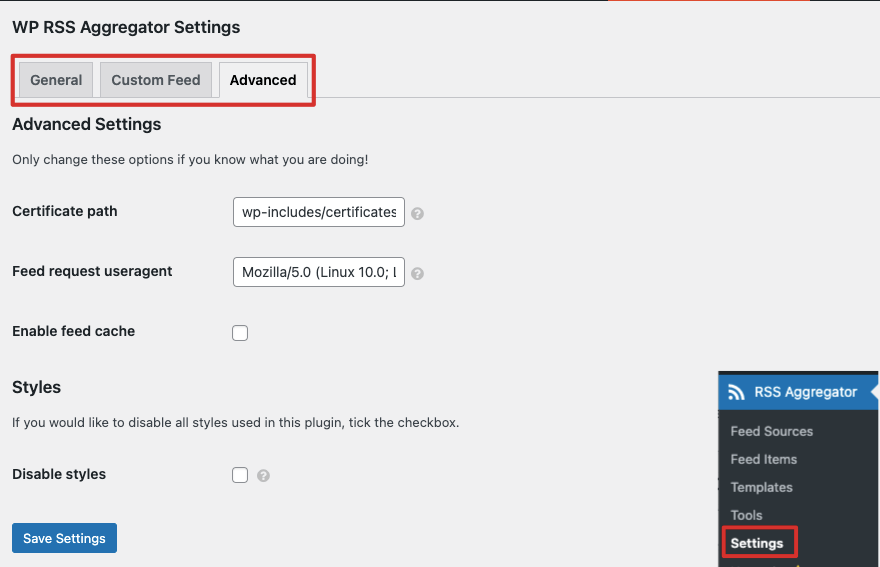
Finally, under the Advanced tab, you get access to settings such as the certificate path, feed request user agent, and enable feed cache. We recommend you leave these settings alone unless you’re sure of what you’re doing.
Coming to the last part of this tutorial – WP RSS Aggregator has a set of tools to make your life easier! Under the RSS Aggregator » Tools page, you’ll see a list of tools that include: Bulk Add Sources, Blacklist, Export, Import, Logs, System Info, and Reset.
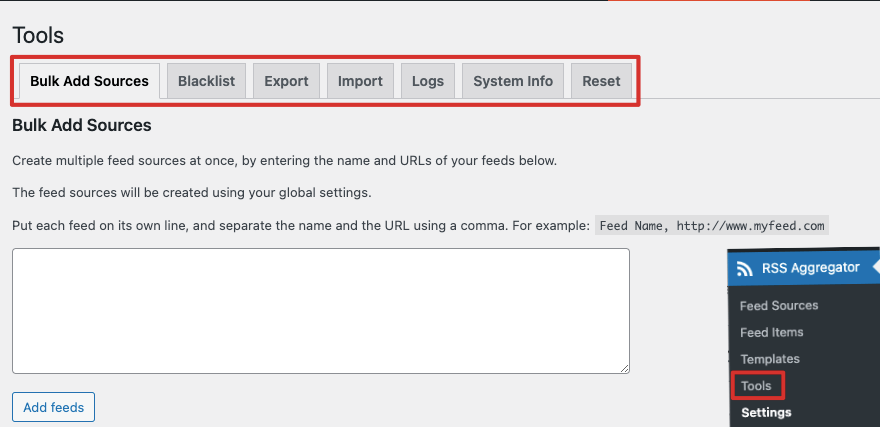
All of these tools are helpful. Under Bulk Add Sources, you can create multiple feed sources at once instead of setting up each one manually. Simply enter the name and URLs of your feed and the plugin will apply global settings to all of them.
You can also import and export your feed sources with ease.
That’s about it! We hope you found this tutorial helpful. Below, we answer questions users frequently asked by auto bloggers.
FAQs on Autoblogging
Is autoblogging legal?
Autoblogging itself is not illegal, but it’s essential to ensure that you’re using content ethically and legally, respecting copyright laws and providing proper attribution to original post and content creators.
How often should I update my autoblog?
The frequency of updates will depend on your niche and audience preferences. Experiment with different update frequencies to find what works best for your site.
Can I monetize my autoblog?
Yes, you can monetize your autoblog through methods such as:
- Display advertising (such as Google Adsense),
- Affiliate marketing (Amazon or any product in your niche),
- Selling products or services.
What are some popular autoblogging plugins?
Some popular autoblogging plugins include WP RSS Aggregator, Feedzy RSS Feeds, and CyberSyn.
Who is autoblogging best suited for?
In our expert opinion, autoblogging works well for scenarios such as:
- Curated Websites: Gather news or content related to a specific topic and present it in one place.
- Company Intranets: Share internal updates or resources automatically.
- Private Websites: Create a feed of relevant information for a closed group.
What is content spinning?
Content spinning is taking an existing piece of content and using software or manual methods to rewrite it in a way that produces multiple variations of the original content.
The purpose of content spinning is to create numerous versions of an article, blog post content, or other types of content, with the goal of publishing them across different platforms or websites.
But it has been misused across the internet by users who steal published content run it through spinner tools, and publish it as their own.
Is my domain name important for an autoblog?
A good domain name offers several benefits for long-term success and brand building.
- People are more likely to remember and return to a site with a clear brand name.
- Many ad networks consider the quality and relevance of your website when serving ads. A good domain name that reflects the content of your autoblog can improve the quality score and potentially lead to better ad revenue.
- A well-chosen domain name can give you the flexibility to expand your site even into eCommerce in the future.
If your autoblog is just a temporary project and you don’t plan to build a brand or monetize it, then the domain name is less critical. You could even use a free subdomain.
Next, you may want to find ways to grow your traffic from search engines. Check out AIOSEO – the best SEO tool for WordPress. It comes with a dedicated module for news websites so that your sitemaps and settings are always updated.
You may also want to see 13 Best WordPress Social Media Plugins to Grow Your Online Presence.


Leave a Reply