
Do you want to create a donation form that meets all your needs?
You can create a neat and functional donation form that lets users either make a one-time or recurring contribution. Most importantly, every payment you collect online needs to be secure.
You don’t need to be a non-profit organization for this. You can ask followers to donate to a free service, product, or blog that you’re providing as well.
In this step-by-step tutorial, we’ll show you the best method to create a donation form that gives you control over how users contribute. Plus, this method will also ensure secure payments with protection against spam and fraud.
What You Need to Create a Donation Form
To create a donation form on your WordPress site, all you need is a form builder plugin. The best one out there is WPForms.

WPForms lets you create any kind of form you need for your site including donation, events, contact, feedback, signup, and more.
This plugin comes with a user-friendly drag-and-drop builder that lets you customize your online donation forms in minutes, even if you have no coding experience. All you need to do is choose the fields you need, edit the text, and you’re good to go.
You can add set donation amounts or let the user choose the amount they want to donate. You can also let them choose items and display a total that’s automatically calculated for you.
If you want to add more advanced features to your form, then WPForms has you covered. It comes with smart conditional logic which lets you display the next question based on the user’s response.
WPForms also has tons of add-ons to extend functionality. For instance, it lets you make your forms conversational style. So if you have a long form, then you can ask the user one question at a time so as to not overwhelm them right at the start.
To collect payments, you can connect to payment gateways including PayPal, Stripe, Authorize.net, and Square. Users can then choose to pay from multiple payment methods including credit card, debit card, internet banking, or digital wallet. It’s as easy as clicking a few buttons to enable the payment options.
Here are a few more highlights of WPForms:
- 1000+ form templates
- Instant admin email notifications
- Instant donor email confirmations
- Recurring donations
- Customizable Donate button
- Email marketing integrations
- Dedicated support
For this tutorial, we’ll be using WPForms to create your donation form. If you want to explore other options, then we suggest WP Simple Pay and WP Charitable. WP Charitable lets you create multiple fundraising campaigns. You can also allow users to start their own campaign with monetary goals or time limits.
That said, let’s get started with creating your donation form in just 5 simple steps.
How to Create a Donation Form
Step 1: Install WPForms
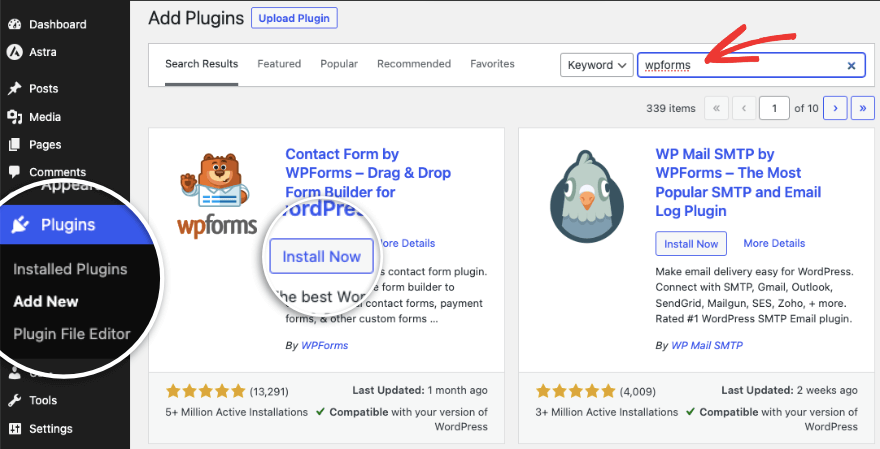
To install WPForms, log in to your website’s dashboard, go to the Plugins » Add New page. Search for “WPForms” and install and activate it.
This is a free version that gives you access to the essential features you’ll need to create basic forms on your site. It includes the Stripe payment gateway and you’ll incur transaction fees + Stripe fees.
If you want to you prefer to remove these additional fees, and access more payment options, powerful features, and templates, then you’ll want to sign up for the Pro version.
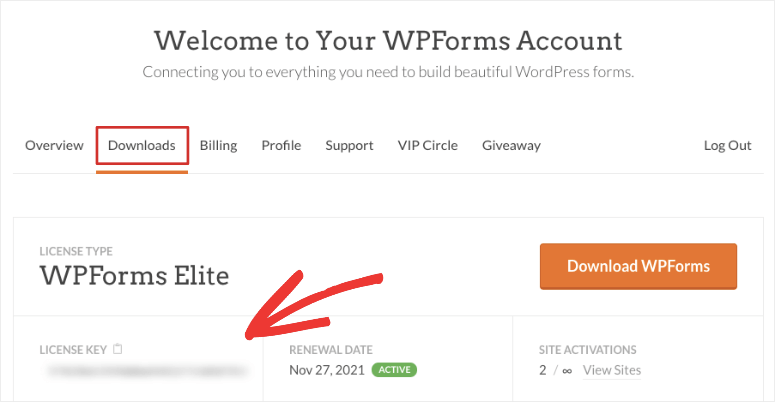
Head to the WPForms website.
Choose your plan and create an account. You’ll get a license key that you need to copy.
Then go to WPForms » Settings page and paste the key here.
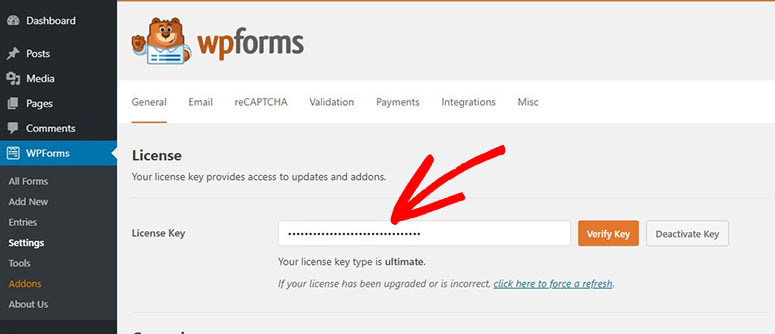
Once you activate the license, you’re ready to create your WordPress donation form.
Step 2: Create a Donation Form
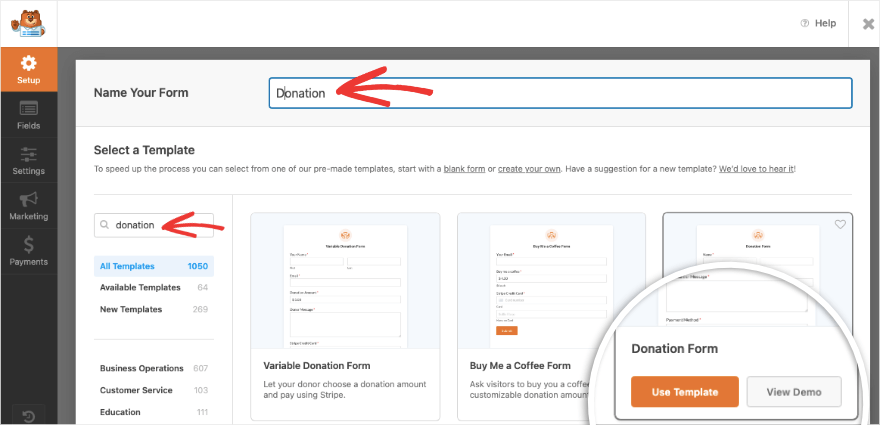
Open the WPForms » Add New tab in your WordPress dashboard. This will open up the WPForms template library where you can search for “donation” and choose one of the donation form templates that match your needs best.
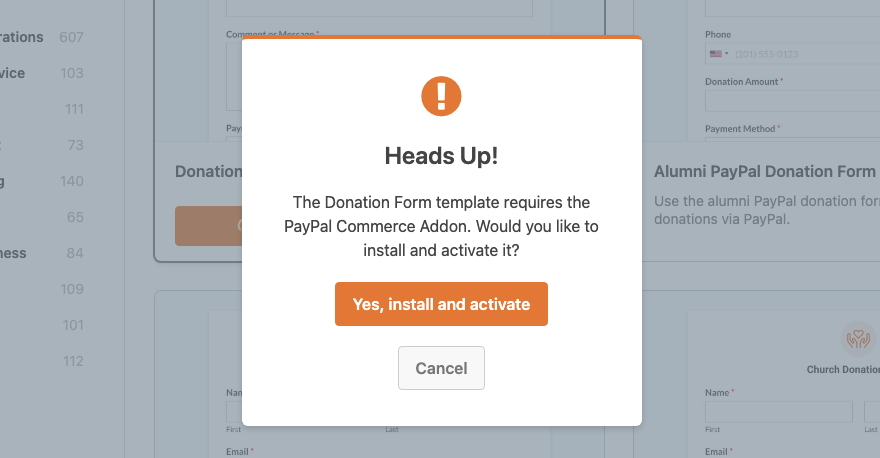
Once you hit the “Use Template” button, you’ll see a popup appear to enable the PayPal gateway in order to use this template. Simply click ‘Yes, install and activate’.
Now the WPForms drag and drop builder will launch.
Here, you’ll see a preview of your template on the right with an editing taskbar on the left.
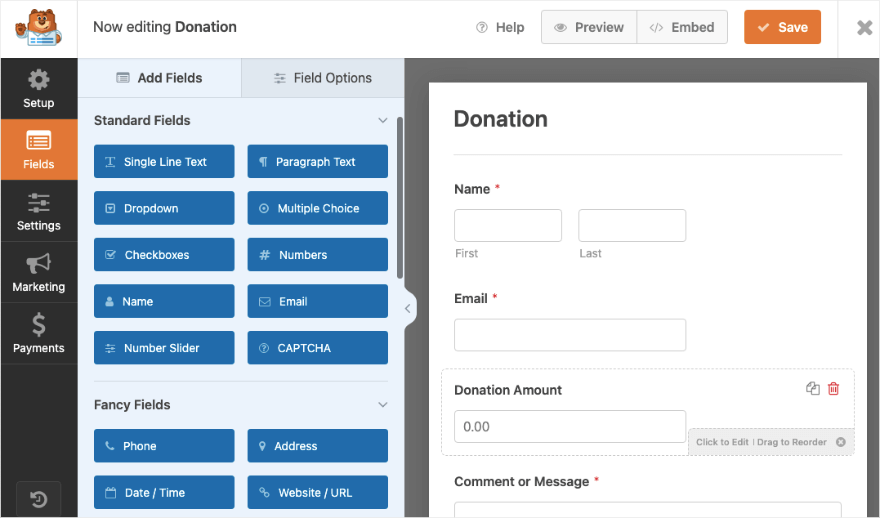
This builder is so easy to use. To add new form fields, simply pick one up from the left menu and drag and drop it into your form preview.
You can click on any field to edit the text. If you want to reorder the fields, simply click on it and drag and drop it to wher eyou want it to appear.
We’re going to show you how to create a smart logic form where users can choose to make a preset contribution or enter their own amount.
Step 3: Add Smart Conditional Logic (Optional)
Smart conditional logic lets you show or hide fields based on a user’s response. This makes the form shorter and improves the user’s experience.
To get started, let’s first add a ‘checkboxes’ field to the form and select it. You’ll see options to edit this field on the left.
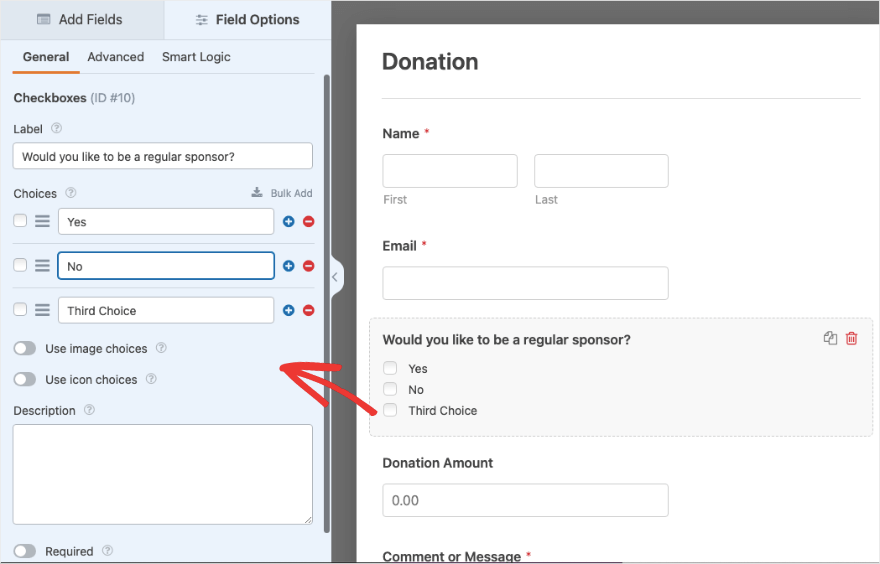
You can change the label and the text of each field available. There are plus and minus buttons to add or delete checkbox fields.
If you want to make your donation form pop, you can also include images to your choices.
At the bottom of the left menu, there’s a toggle button called ‘Required’. If you enable this, then the user will have to fill up this form field before they can submit the form.
Next, we’ll add a dropdown field and add the contribution amounts that you want to offer donors. This will make it easier for them to choose an amount and make the donation fast:

Now we’ll show you how to show or hide your form fields based on the user’s response.
Choose the field you want show or hide, then open the Smart Logic tab at the top menu.
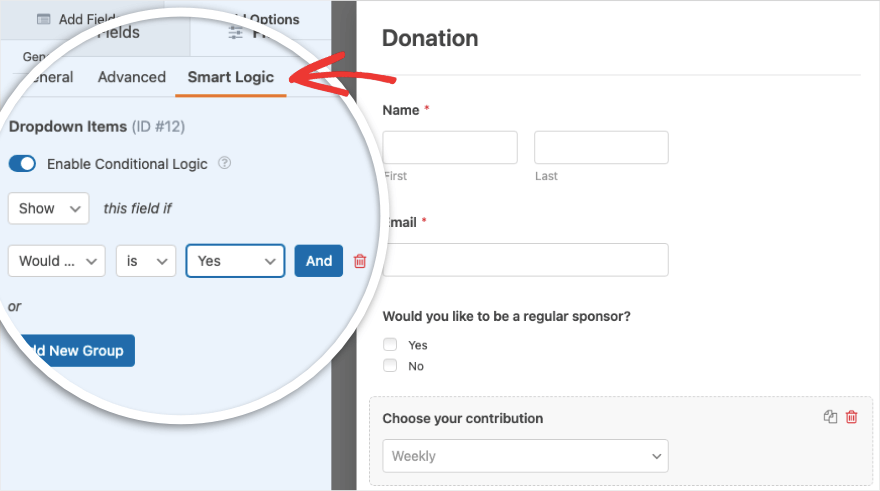
You’ll see a new menu appear on the left. First, enable conditional logic. In our example, we’ll ‘show’ this field if ‘Would you like to be a regular sponsor?’ is ‘Yes’.
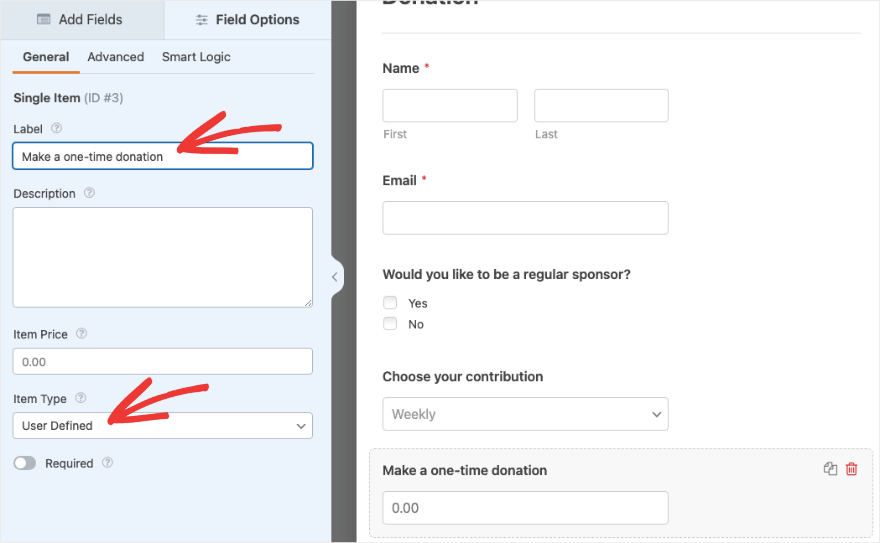
Now if the user’s response is no, we’ll show them a field where they can enter their own contribution amount. To do this, add a single item payment field to the form.
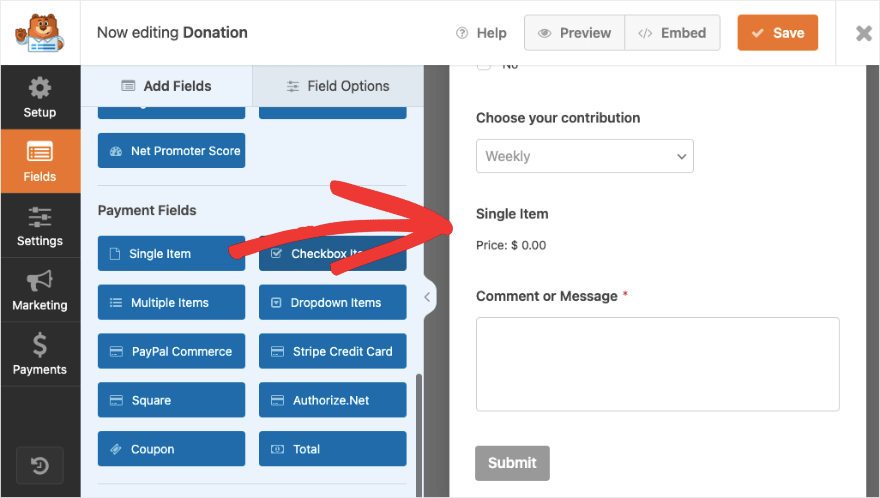
When you select this field, you can configure the options here. To allow users to choose their own amount, make sure the ‘Item Type’ is set to User’s Defined.
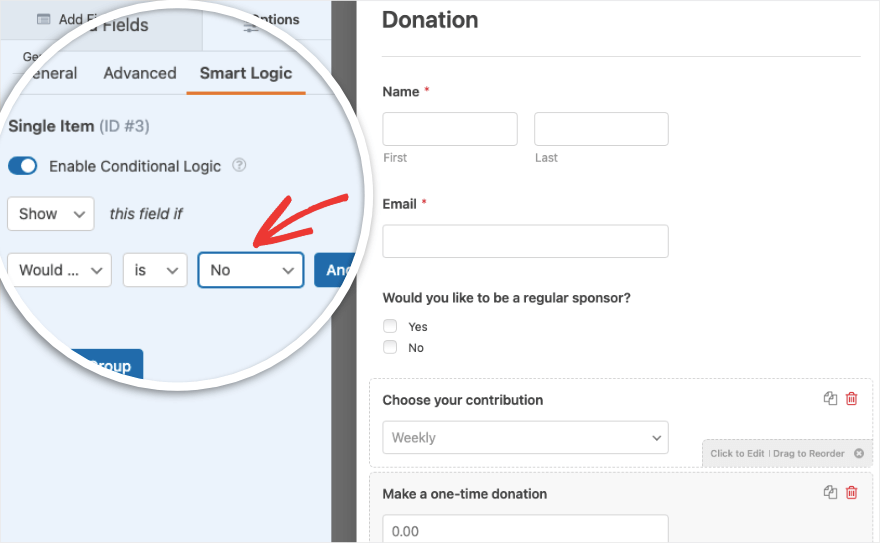
Now we can switch to the Smart Logic tab and enable conditional logic. Then choose to show this field if ‘Would you like to be a regular sponsor?’ is ‘No’.
That’s it. Now your form is powered by smart conditional logic. Make sure you save your form, and we can head to the next step where we’ll add the payment integration.
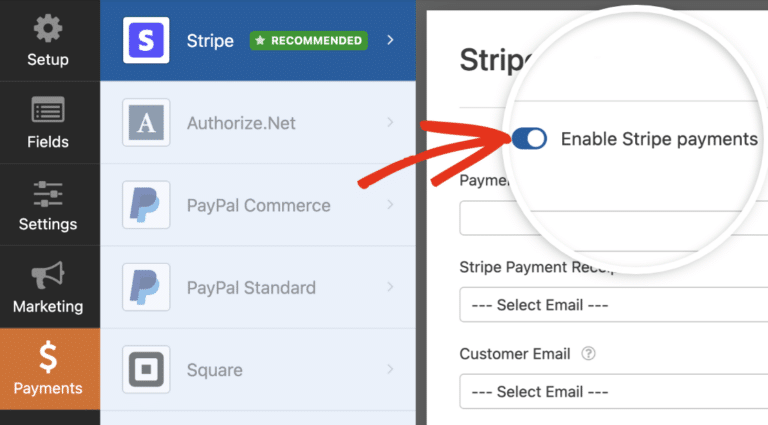
Step 4: Connect to a Payment Gateway
To be able to use a payment gateway for this form, we first need to set it up under WPForms » Settings page. Under the Payments tab, you can follow the onscreen instructions to connect to your payment gateway.
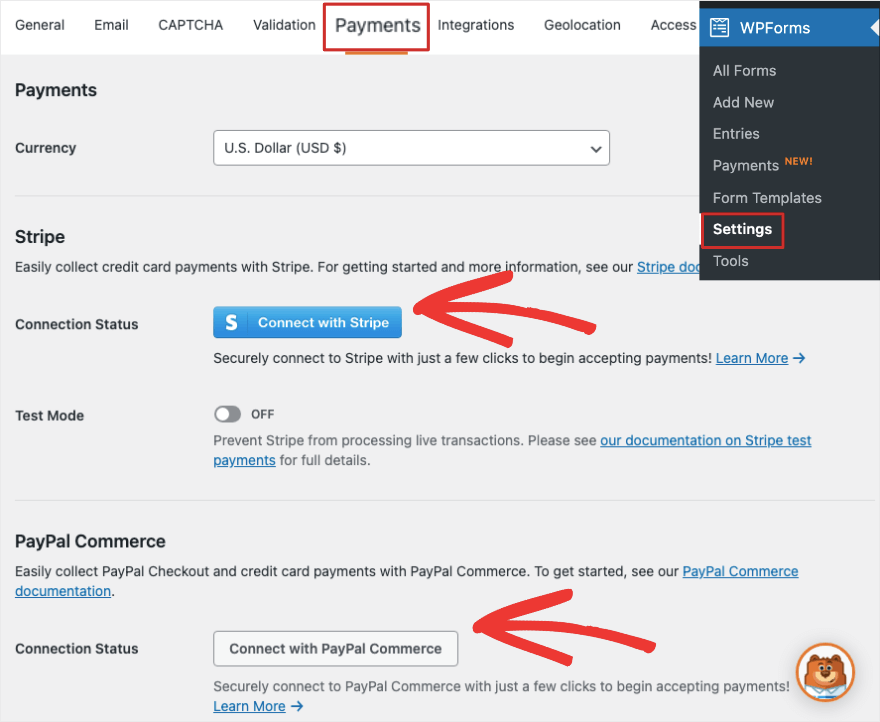
You can connect to Stripe. If you’re on a Pro plan, you’ll also get options to use PayPal, Authorize.net, and Square.
Back to editing your donation form in the WPForms builder, you should see a menu on the far-left of the screen. Open the Payments tab here.
Now you can choose to enable the payment gateway you have already set up.
Step 5: Connect to Email
If you want to save your donor details to your email list, you can connect to your favorite email providers like Constant Contact, AWeber, Drip, and more.
Open the Marketing tab on the left, and you can choose your email service.
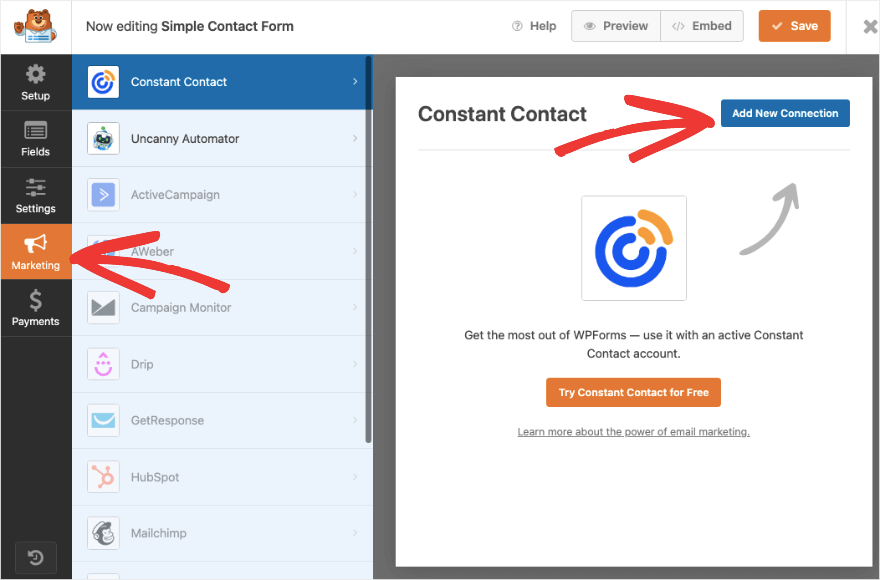
WPForms is pretty straightforward with this so you just have to follow the onscreen instructions to connect your account.
Now you’re ready to publish the contact form on your site.
Step 5: Publish the Donation Form
You can add your donation form anywhere you like on your website such as a page, post, sidebar, or footer.
First, to add the form to an existing or new page or post, open the block editor. Use the Plus icon to add a new block and search for ‘WPForms’.
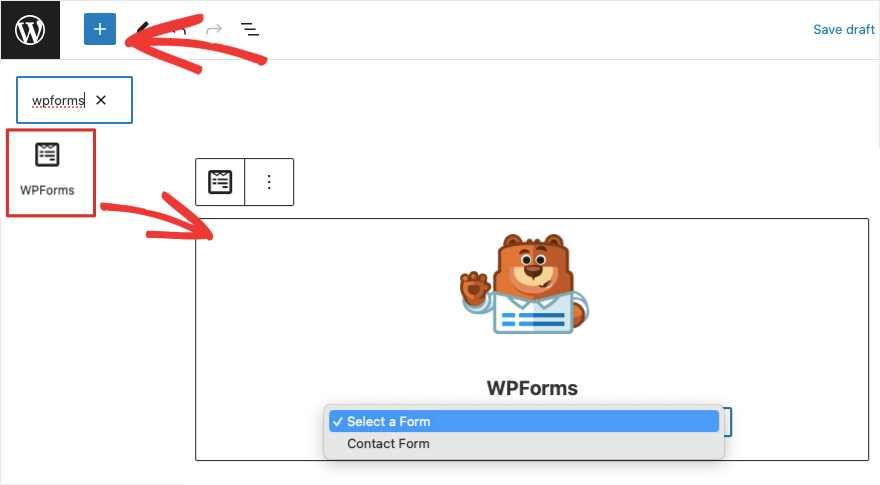
When you add the WPForms block to your page, you’ll see their mascot Sullie appear with a dropdown menu.
You can choose the donation form you just created. Preview your form on the front-end and publish your page or post for it to go live on your site.
If you’re still using the Classic editor of WordPress, you’ll see an “Add Form” button at the top menu. This lets you add the form to your page.
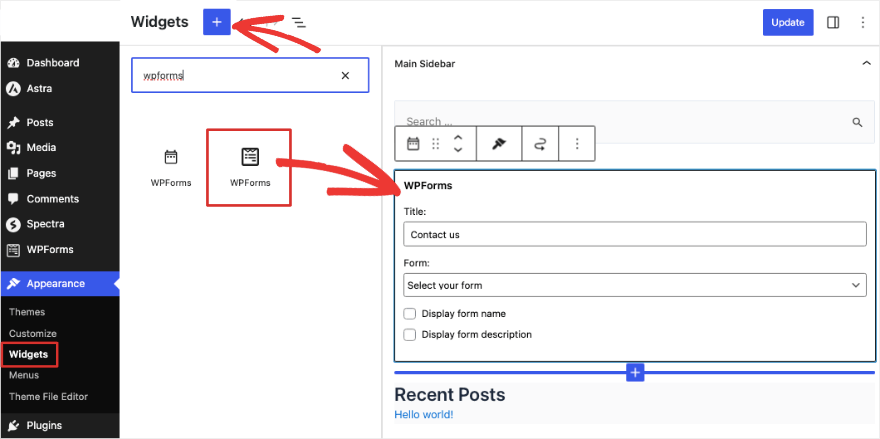
Lastly, to add the form to a widget-ready area such as a sidebar, go to the Appearance » Widgets tab. Add the WPForms block to your sidebar or footer, and choose your donation form from the dropdown menu
You’ll find the WPForms block available in all popular page builders like SeedProd, Elementor, and Thrive Architect. So even if you’re using a page builder, it should be simple to add the form to a donation page on your site. It’ll also be easier to integrate the style into any WordPress themes you’re using
WPForms also supports shortcodes so you can use the code to embed your contact form anywhere on your website.
That’s it! You’ve successfully added a donation form to your WordPress site. You’re ready to accept donations online.
If you’re on the pro plan, you can also manage all your donor entries right from your WordPress dashboard. WPForms also shows you analytics about how your donors interact with the form and how well it’s performing.
We hope you found this beginner’s guide helpful in setting up your donation form.
If you’re sending donation confirmation emails using your WordPress website, you’ll likely face email delivery failure issues. We recommend using WP Mail SMTP, it will resolve all those problems and ensure your emails are delivered.
Up next, you may also want to create a donor’s portal or membership area on your site. See our list of the 7 Best WordPress Membership Plugins that help you do that.