
If you’ve been blogging for a while, you’ll know that search engines continue to emphasize page speed in its algorithm. Aside from SEO factors, page speed has a huge influence among your visitors in deciding whether they should stay on your website or not. In fact, studies show that 40% of your visitors will abandon your website if it takes more than 3 seconds to load.
While the above statistic indicates the importance of page speed for your entire website, the condition is even more critical when it comes to your mobile visits.
For instance, if your website is comparatively heavier and is not well optimized for faster page rendering, chances are your site consumes more mobile data, which likely turn off your visitors leading to abandoning your website.
Google AMP = Super Fast Mobile Browsing
Google has recently initiated an open source project known as Accelerated Mobile Pages (AMP). This initiative aims at speeding up the mobile browsing experience tremendously. So even if you’re on a mobile device with a poor internet connection, you can load an AMP version of the website almost instantly.
Wondering what makes AMP stands out from the other speed optimization tactics?
Unlike other tactics, with AMP, you’ll be using a separate light-weight template for your website, which is a stripped down version of your existing WordPress theme, built specifically for one single purpose—boosting the page speed.
In order to skyrocket your page speed, AMP forces you to use a streamlined version of CSS and doesn’t allow any JavaScript element on your page. You’ll also need to use off-the-shelf JavaScript library that forces images to lazy load.
Aside from that, once your AMP pages get indexed, it will be cached on Google AMP CDN, resulting in super fast page rendering.
How does AMP work?
While AMP is specifically focused on supercharging the mobile browsing experience, the intention is not to replace responsive design with it. In fact, AMP pages are not served directly when someone visits your website. Instead, it is served only by AMP consumers such as Google search and Twitter.
For instance, you might have already noticed a lightning signal in Google search results indicating that the web page shown is an AMP version of the original page.

So when you click on such pages from SERPs, you’ll be directed to a cleaner, faster and streamlined version of the web pages that instantly loads on your device regardless of the internet speed.

Similarly, when you click on a link in a tweet from Twitter’s native app, you’ll be directed to AMP pages for faster page rendering provided that the site is integrated with AMP.
Should you implement AMP?
By creating an AMP version of your WordPress website, you’re putting speed and readability as top priorities over anything else. Because you wouldn’t be able to use interactive elements like JavaScript on your AMP pages, you might not want to create an AMP version of all of your existing pages.
For instance, you might not want to create a stripped down version of your landing page just for the sake of increasing speed because speed is not the top priority for your landing page but conversion.
On the other hand, you can create AMP pages for your blog posts or news section in which speed and readability are top priorities.
How to implement AMP on your WordPress website:
1. Install WordPress AMP plugin
First things first. Go to your WordPress admin and install the AMP plugin by Automattic.
Upon installation, you can find the AMP version of your blog posts by appending /amp / to your post permalinks. No further configuration is needed.
For example, your AMP URL will look like this:
www.yourdomain.com/blog-post/amp/
If you haven’t enabled pretty permalink on your site, you can find the AMP pages of your blog posts by appending: ?amp=1 instead.
Do keep in mind that, installing this plugin will not currently create AMP pages for your Pages and archives. That’s totally fine because we need AMP pages primarily for blog posts.
2. Customize AMP pages
Simply installing the plugin will create a basic AMP layout for your WordPress blog. If you’d like to customize your AMP template and make it looks similar to your existing website, you may need to edit the CSS of your AMP template.
Alternatively, if you choose to install a plugin instead of hard-coding the template, all you need to do is to install the PageFrog plugin.
This plugin also gives you additional support such as Google Analytics integration on your AMP page.
After activating PageFrog, be sure to activate Google AMP HTML.
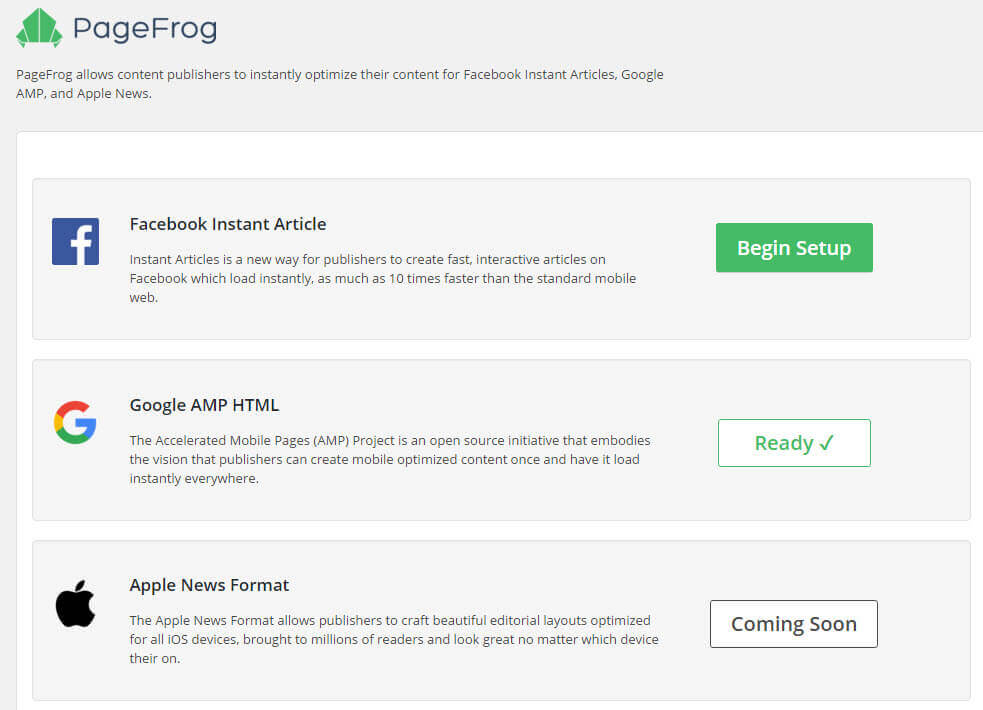
However, if you’re using Yoast SEO plugin on your main site, it is better to install Yoast Glue plugin instead of PageFrog.
3. Check if your page is a valid AMP page
So far we’ve implemented AMP pages on your website and slightly customized its layout.
Now it’s your turn to validate the AMP pages you just created.
The problem with AMP integration with your existing WordPress website is that it is very likely that you’ll find tons of AMP errors in your Google Search Console account just after the integration.
But don’t panic and keep in mind that AMP initiative is in its early days and the official AMP plugin isn’t meant to be an all-in-one solution for your AMP pages.
In fact, it just creates a basic AMP layout for your WordPress website. Due to the fact, you may need to find the causes of AMP errors manually and fix them.
As AMP pages are served only through AMP consumers like Google search, fixing all those SEO errors is an essential task in order to ensure that your AMP pages get indexed on search engines and cached on AMP CDN. This CDN also helps third-party websites like Twitter to easily discover and distribute your AMP page quickly to your site visitors.
You can always find AMP errors by logging into Google Search Console account. Once logged in, navigate to Search Appearance> Accelerated Mobile Pages to find errors.
There are a couple of different ways to validate your AMP pages to fix SEO errors:
- Browser developer console: Simply append #development=1 to your AMP URL and open it in your browser. Once done, you can check validation errors in Chrome DevTools console.
- Web interface: Alternatively, go to validator.ampproject.org. Enter your AMP page URLs and find errors.
Refer to this official guide to get the complete list of AMP validation errors and how to fix them.
Final Takeaways
The primary goal of a search engine is to help users discovers the right solution to their pertinent questions as quickly as possible. This is one of the main reasons why Google pushes page speed as their top priority.
Although Google hasn’t marked AMP as a ranking factor yet, 90% of publishers are already seeing higher CTRs on SERPs for their AMP pages. So if you haven’t implemented it yet, you should be.
Below are a few additional tips that you’ll find helpful when integrating AMP with your site.
Advanced AMP customization: For adding Google Analytics and further tweaking your AMP template, do read this read me page of AMP plugin.
Speed test and validate: While you can always customize AMP templates to a great extent like adding videos, ad banners and so on, always speed test your AMP pages with various speed testing tools and ensure it doesn’t affect your page speed. In addition, check for errors on Google Search Console on a regular basis after every customization.
Optimize your post for AMP: Since users can easily navigate to more pages on SERPs by simply swiping the pages, the average attention span on AMP pages will be shorter than usual responsive pages. Try including hero images on top of your blog posts, which is a sure-fire method to aesthetically please your visitors.
Another thing you need to test on your AMP pages is interlinking your existing blog posts in the intro copy of your blog posts. This practice may help users to stay on longer on your website by navigating to other pages.
I hope now you get a detailed idea about implementing AMP on your WordPress website. If you have any questions, feel free to share them by dropping a line below in the comments section.
We love using AMP! Glad to see that more people are learning about it and using it. Since site speed is such an important factor for SEO, AMP has helped us come up with options for our clients that gives them the edge!
Excellent article. I was looking for this as I was getting AMP pages missing error for my website on semrush. Now I installed the plugins which you recommended and all is fine now.. Thanks for the tutorial.
Hie Guys,
Very informative post and WordPress is among the early supporters of Google AMP Project. Google AMP plugin for WordPress is quite useful for making the mobile web faster i.e. 4 times faster, which will be a crucial factor for enhancing user experience.
Also, Baidu – the Chinese search engine is now supporting Google AMP project and will consider AMP sites in SERP result as Google has made it a norm for getting higher ranking on search result. Very soon others will be following the same trend and we will be witnessing Google’s footsteps.